DIY Instructions for 15 foot Inground Trampoline!
We just got started landscaping our yard and the trampoline was one of the first things we wanted to get done. It’s super windy here in the springtime and we really didn’t want our trampoline to blow away in the wind, like so many of our neighbors warned might happen. Luckily for us, my hubby helped his brother and sister-in-law, from All Things Thrifty, install their trampoline about 5 years ago.
You can find their tutorial here. We followed most of their instructions, but we did make a few changes since our trampoline is a little bit different than theirs. It’s definitely more cost-effective to do this yourself. You can buy kits, but they are pricey, and we did this for a fraction of the cost, and it only took 3 hours!
DIY Instructions for 15 foot Inground Trampoline!
Here’s what you’ll need…
Supplies
5 – 12’ x 2’ Corrugated steel roof panels 15 – 2” x 4” x 10’
Pressure-treated lumber
100 self-tapping screws
30-40 wood screws
Tools
Level Drill Miter Saw Hammer
DIY Instructions for 15 foot Inground Trampoline!
directions
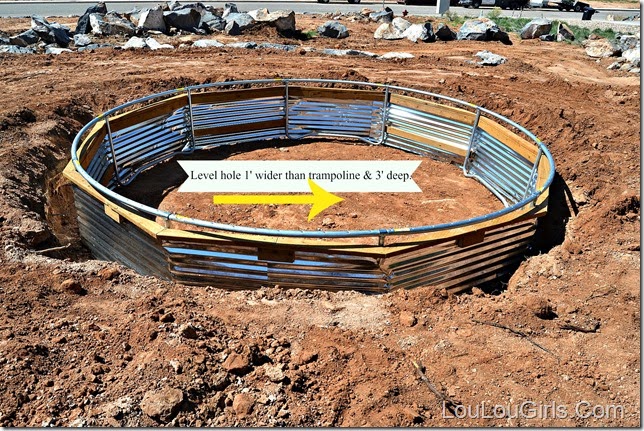
1- Have your landscaper, or DIY, dig a hole 3 feet deep and 1 foot wider than your trampoline. So for our trampoline, the hole was 16’ across the diameter. Our landscaper charged $75 an hour, and the hole was finished in an hour. Prices will vary though, depending on the area you live in.
2- Make sure the bottom of the hole is level so your trampoline will be too. The ground was rock solid, so we didn’t feel like we needed anything under the legs of our trampoline, and our landscaper agreed.
 3- Cut 2×4 boards to the outer length between the legs of your trampoline. Ours were
55 1/2” long each. Make sure you measure yours first since your trampoline might be different from ours.
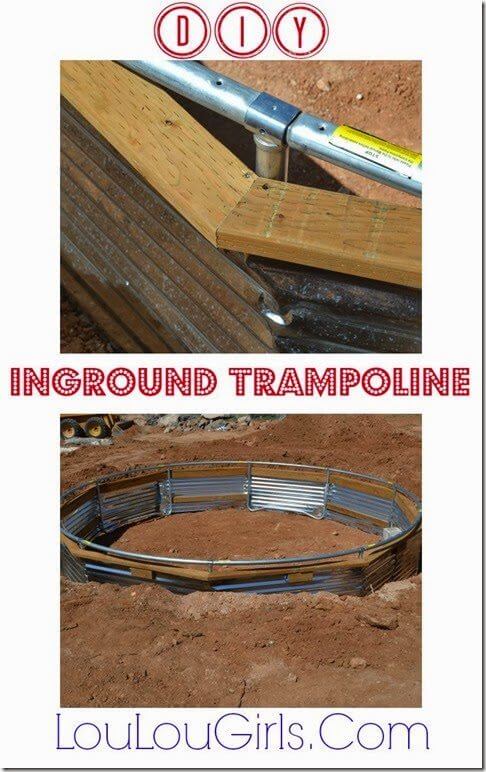
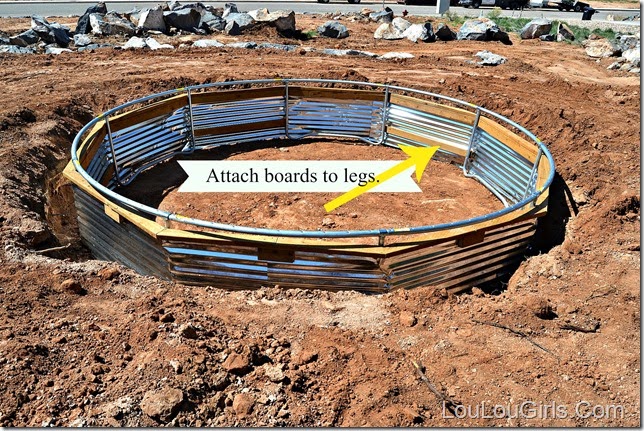
4- Use your self-tapping screws to attach your pre-cut 2×4 boards to the legs of the trampoline. Your top board should be at least 4” down from the top bar of the trampoline, to allow the air to escape while jumping.
We alternated from 1 to 2 boards per section. See the picture for visual aid. We skipped the bottom board where the trampoline leg was raised and just tapped the screws into the legs in those areas, instead of attaching aboard.
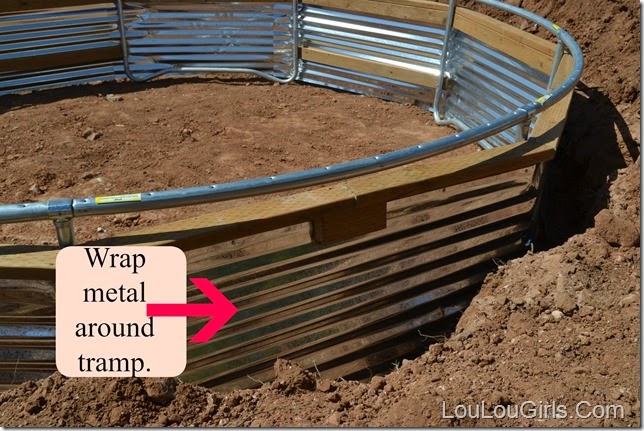
5- Take the corrugated sheet metal and, starting an inch from the top of the top 2×4, begin screwing the metal into the frame you just built with the 2×4’s. Secure on the top and bottom of the sheet metal.
6- Continue wrapping the sheet metal, overlapping by 2 feet on each section to strengthen the walls.
7- To give the top a finished look, and to prevent small toes from being caught on the sheet metal, use the remaining 2×4’s to trim the top of the sheet metal. Cut each 2×4 at an 18-degree angle. Your boards will have a trapezoid shape with an 18-degree angle where the boards meet.
8- Use the wood screws to attach the flat boards to the boards on the frame.
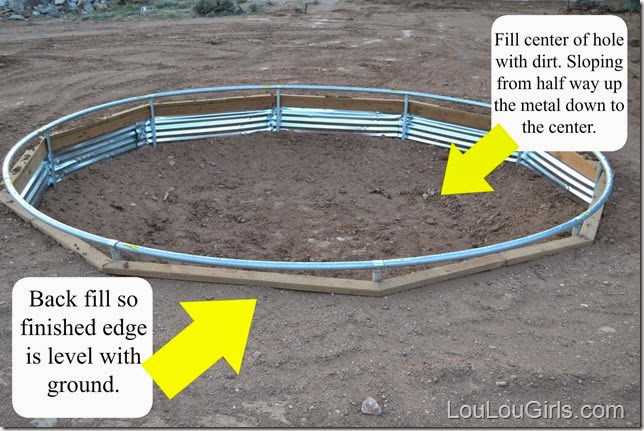
9- Put the trampoline back into the hole, and backfill the hole so the outer walls of the trampoline are covered.
10- In the center backfill up against the sheet metal halfway up and sloping down to the center.
DIY Instructions for 15 foot Inground Trampoline!
11- Put your trampoline back together and enjoy! The final cost of this project was about $255. The materials were about $180 from Home Depot, and we paid the landscaper roughly $75 to dig the hole and backfill.. It’s definitely worth your time to DIY! You might like these other DIY projects. Click on the picture for the links! ![DIY-headboard-tutorial-upholstered_thumb[3] DIY-headboard-tutorial-upholstered_thumb[3]](http://lh6.ggpht.com/-OcVHVSP6jtc/VSSdd1z6z4I/AAAAAAAAHb0/lrOEUxT18r8/DIY-headboard-tutorial-upholstered_thumb%25255B3%25255D%25255B5%25255D.png?imgmax=800)

![How-to-build-a-chevron-barn-door_thumb[7] How-to-build-a-chevron-barn-door_thumb[7]](http://lh5.ggpht.com/-E3eFx0Ed_BU/VSSdfVffihI/AAAAAAAAHcE/RaY5Jetgatg/How-to-build-a-chevron-barn-door_thumb%25255B7%25255D%25255B5%25255D.jpg?imgmax=800)


 Your Closest CHEERLEADERS!
 We are your big sisters , cheerleaders , and confidence boosters in building a happy home. We are the Lou Lou Girls!


I've never seen an in the ground trampoline before, I guess that would be safer! Thanks for sharing with us at Pin-Worthy Wednesday!
wow! That is some amazing elbow grease you applied to this project. I'm sure it was sooooo worth it when you no longer have to worry about the kids falling off.
It is worth it, plus we had a big wind storm today and we were so glad that it was in ground! All our neighbors flew away! Thanks!
I will definitely be showing this to my husband, we have one in our local park and the kids love it. You provide such clear instructions, thank you so much for the tutorial xx
You're welcome! Thanks for stopping by!
I. am. so. JEALOUS. My friend's did this and it's the best thing ever. No falling off, no moving it to mow the grass underneath, not an eyesore…. AHHHHHH BUT I CAN'T CONVINCE MY HUBBY!!!! I don't know why. He's so stubborn. 🙂 Thanks for sharing on Kammy's Korner!! (Oh yeah, and it wouldn't blow away like you stated in above comment!!) I need to send this post to him.
Good luck convincing your husband! It really is super easy to do, and the wind is reason enough for us here. It's super windy in the Spring! Thanks Kammy!
Wow. Looks like quite an undertaking. Thanks for linking up and sharing with us at Funtastic Friday. Hope you can make it again this week.
You can search for those pads that are Twenty Five mm thick. You can't put your and your loved ones' lives at risk. Protect them from accidents with the best trampoline pads.here
I know this post is several yrs old but I’d like to know how the trampoline is holding up. Have you had any issues. Do you have any finished product pictures? We are in the process of doing this with ours. Hoping it will all go smooth.
yes, it is!